Building a Portfolio block
You can download the slides for this workshop from the slides PDF
Getting set up
In your terminal:
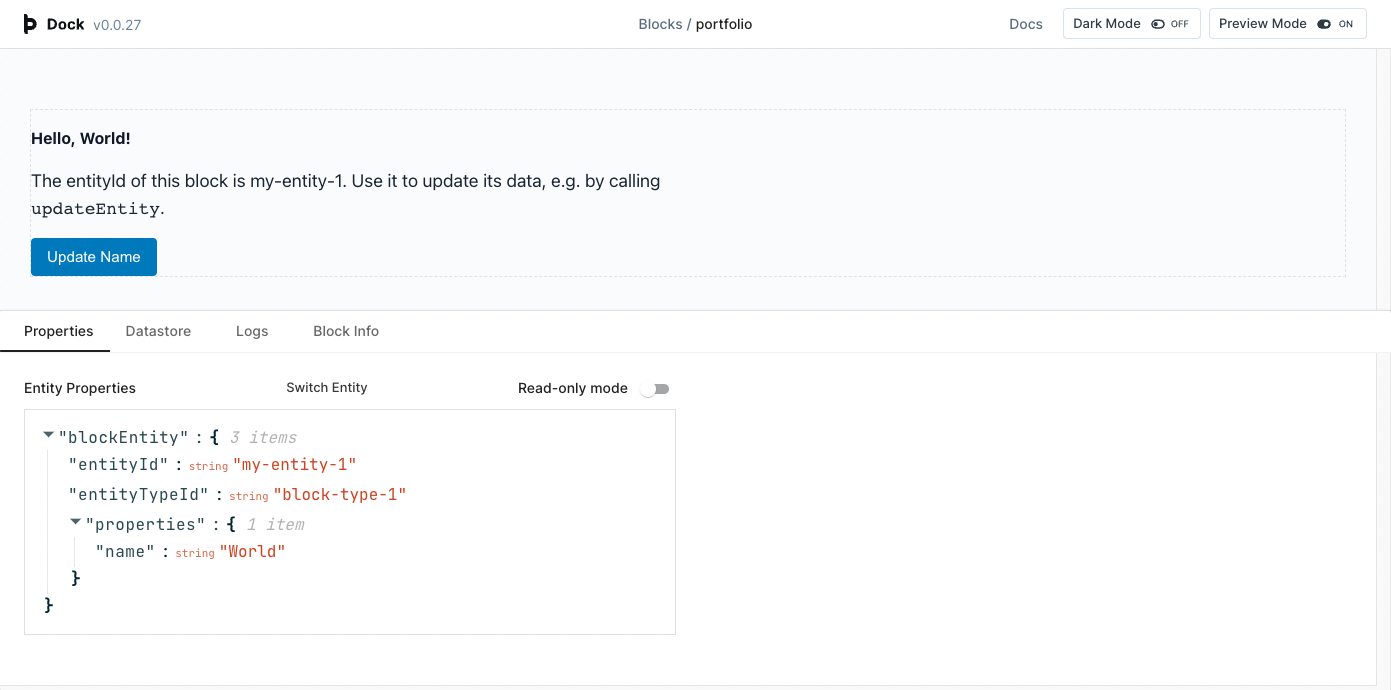
npx create-block-app@latest your-block-namecd your-block-namenpm install && npm run devoryarn install && yarn devvisit http://localhost:63212 – you should see a ‘Hello, World!’ UI that looks like this:
Important files
You will be editing two files:
src/app.tsx- this is your block’s entry point – it is what an embedding application will evaluate and insert into a page
- it sets up communication with the embedding application and defines the elements your block will include
src/dev.tsx- this is the application launched when you runyarn devornpm run dev- it is for local development only, and is not included when your block is published
- it contains sample data you can edit to test your block
Understanding the debug UI
The debug UI is provided by a package called mock-block-dock, or simply 'Dock'.
It emulates an embedding application by rendering your block, listening for messages from it, and maintaining an in-memory datastore of sample data which is updated in response to requests from the block.
Important things to know:
your block is outlined with a faint, dotted line to show how much space it is taking up. This line is not part of the block and will not appear when it is used for real
there are three tabs along the bottom to help you build your block:
Properties: this shows you the properties of the 'block entity'. By this we mean the entity that is loaded into your block. It starts off with whatever values you define in
dev.tsxforblockEntity, but you can edit them here. You can also click 'switch entity' to choose another entity from the datastore to associate with your blockDatastore: this shows you the entire contents of the mock datastore. We will go through the important parts in a minute. Both the raw records and a graphical representation of the entities and the links between them are included
Logs: this is a record of all the messages sent between your block and the embedding application. It is helpful to check that the messages you expect are being sent from your block, and to see the response from the embedding application
The Portfolio block
The aim of the block is to show off a Person and one or more Projects they’ve worked on.
We will make our block in the following steps:
Display info about a person
Display info about projects linked to the person
Allow editing of the data (whether the person, projects, or links)
First, a word about entities.
Entities
Entities are pieces of data, often representing and corresponding to a thing in the real world.
In the Block Protocol, entities have an entityId which unique identifies them, and properties which are the data they own.
The expected structure of a given entity's properties is described by its entity type.
For example, the structure of the Microsoft entity might be described by the Company entity type.
The formal specification for defining entities can be found in the Block Protocol entity definition spec.
We are going to be working with entities of type Person and Project.
Here are sample types for their properties - you could pick some of these fields for your block to deal with.
/**
 * This is an example type for the properties on a Person entity
 */
type PersonProperties = {
  description?: string;
  email?: string;
  imageUrl?: string;
  location?: string;
  name: string;
  profession?: string;
  skills?: string[];
  url?: string;
};

/**
 * This is an example type for the properties on a Project entity
 */
type ProjectProperties = {
  company?: string;
  date?: string;
  description?: string;
  imageUrl?: string;
  keywords?: string[];
  name: string;
  url?: string;
};
We'll start with talking about the entity that will be associated directly with our block, which will be a Person.
Working with blockEntity
The Block Protocol allows blocks to retrieve and edit entities in an application.
There is one special entity: the "block entity", which is the entity currently associated with the block, or loaded into the block by the application.
This special entity is automatically provided to the block by the application, as blockEntity.
Each block should define the properties it expects this entity to have.
In the template, we do this by defining a BlockEntityProperties type. It starts off with simply name, but
let's add a couple more fields to represent a Person:
// src/app.tsx

type BlockEntityProperties = {
  description?: string;
  name: string;
  profession: string;
};
description is marked as optional, by the ?. This means that applications can send the block an entity without it.
We then use this type to specify what properties our App component should expect.
In the React template, data which is automatically provided to the block by the application is available on the graph
property on the properties passed to the App function.
The graph object here contains data that the application sends automatically to the block – as well as the blockEntity,
this can also contain blockGraph and readonly, which we'll discuss in a little while.
// src/app.tsx

export const App: BlockComponent<BlockEntityProperties> = ({
  // here we use the type
  graph: {
    blockEntity: { entityId, properties }, // here is the block entity, taken from the 'graph' object
  },
}) => {
  // ...
};
Whatever properties you define in the BlockEntityProperties type will be the ones available on blockEntity.properties.
To provide sample values for whichever properties we want our blockEntity to have, we can update it in dev.tsx.
At the same time we can update the entityId to something more meaningful for this entity to make the sample data easier to work with.
// src/dev.tsx

const DevApp = () => {
  return (
    <MockBlockDock
      blockDefinition={{ ReactComponent: Component }}
      blockEntity={{
        // This is the 'blockEntity' which your block will receive as part of the properties sent to it
        entityId: "person1",
        properties: {
          name: "Ciaran",
          profession: "Software developer",
        },
      }}
    >
      // ...
    </MockBlockDock>
  );
};
Now, back in our block we can extract them from properties, and assign a default to any that are optional,
in case values are not provided.
// src/app.tsx

export const App: BlockComponent<BlockEntityProperties> = ({
  graph: {
    blockEntity: { entityId, properties },
  },
}) => {
  // Here we extract the properties from the blockEntity's properties
  const {
    description = "A person without a description]",
    name,
    profession,
  } = properties;
};
Finally, we can show the values to the user.
// src/app.tsx

// ...
return (
  <div className={styles.block} ref={blockRootRef}>
    <h1>{name}</h1>
    <h2>{profession}</h2>
    <p>{description}</p>
  </div>
);
Linked entities
Now we are displaying info about the person, we can move on to showing the projects linked to them.
To do so, we need to understand the concept of linking entities together to form a graph.
The Block Protocol's graph module defines a system containing entities connected by links.
A network of entities connected by links is known as a graph (if you know the terms, you can think of entities as nodes or vertices, and links as edges – don't worry about these if you don't).
The graph module allows applications and blocks to exchange data about the network of entities and links within an application, and make requests to create or edit them.
We already discussed the structure of entities, so let's look at links now.
Links
Links define a relationship between one entity and another.
Links in the Block Protocol are "directed", i.e. they go in a direction from one entity to another.
They contain:
sourceEntityId: the entity this link is fromdestinationEntityId: the entity this link is topath: you can think of this as a label or description of the relationship. It gives the relationship semantic meaning, e.g. "founder", "employer", "friend"
Working with blockGraph
The blockGraph is a message sent from the application to the block, transmitting the part of the graph which is linked to the blockEntity.
That is to say, blockGraph provides the entities linked to the block entity, and the links connecting them.
blockGraph contains:
linkedEntities: the entities linked to the block entity (and possible entities connected to those, depending ondepth)linkGroups: the links from the block entity (and possibly from the entities connected to it), grouped by source entity in path- i.e. every object in the
linkGroupsarray contains asourceEntityId, apath, andlinkswhich have the same source and path
depth: how many links have been followed outwards from the block entity in providingblockGraph. A depth of1means that entities linked to the block entity are provided. A depth of2means that entities linked to those entities are also provided, and so on
Providing sample data
We're already providing a sample blockEntity for our dev environment, in src/dev.tsx –
now we can specify other entities in the datastore, as well as links between entities.
MockBlockDock comes with some sample entities and links in the datastore by default – which you can see in the 'Datastore' tab
when you run yarn dev - but we can override these by setting initialEntities and initialLinks.
I'm going to set initialEntities to two projects I've worked on, and initialLinks to link the blockEntity
to the two new project entities:
// src/dev.tsx

const DevApp = () => {
  return (
    <MockBlockDock
      // ...
      initialEntities={[
        {
          entityId: "project1",
          properties: {
            name: "Block Protocol",
            description: "An open standard for building block-based interfaces",
            keywords: ["blocks"],
          },
        },
        {
          entityId: "project2",
          properties: {
            name: "HASH",
            description: "Create shared, structured knowledge",
            keywords: ["ontology", "data", "workspace"],
          },
        },
      ]}
      initialLinks={[
        {
          sourceEntityId: "person1",
          destinationEntityId: "project1",
          linkId: "link1",
          path: "projects",
        },
        {
          sourceEntityId: "person1",
          destinationEntityId: "project2",
          linkId: "link2",
          path: "projects",
        },
      ]}
    />
  );
};
Reading blockGraph
Now that we have some entities linked to the blockEntity, we can read those entities and the links from blockGraph.
To do, first we add blockGraph to the data that we are taking from the graph module object.
We can also go ahead and get references to linkedEntities and linkGroups from blockGraph:
// src/app.tsx

export const App: BlockComponent<BlockEntityProperties> = ({
  graph: {
    blockGraph, // adding 'blockGraph' so we can use it in our block
    blockEntity: { entityId, properties },
  },
}) => {
  // Extract linked entities and links from blockGraph;
  const { linkedEntities, linkGroups } = blockGraph ?? {}; // fallback in case the app doesn't provide it
};
As a reminder, these are:
linkedEntities: the entities linked to the block entity (and possible entities connected to those, depending ondepth)linkGroups: the links from the block entity (and possibly from the entities connected to it), grouped by source entity in path
We won't bother with checking depth since we don't need to go beyond 1for now (entities linked to the block entity),
and MockBlockDock will automatically provide a depth of 1.
What we should do is check for only those links which have a path (a meaning / label) we care about – there might be entities
as part of blockGraph which are linked to the block entity for different reasons. We don't want those.
I set my link path to projects, so we'll use that to get out the links related to the projects path:
We also want to check that the links' sourceEntityId is the same as blockEntity.entityId, in case the application
has provided links from other entities as well (it might do this if it resolves graphs to a higher depth).
This function finds the link group which meets those two conditions:
const projectLinkGroup = linkGroups?.find((group) => {
  return group.sourceEntityId === entityId && group.path === "projects";
});
Now we have the links we care about, we need to find the entities which those links point to.
It'll also be useful to have a type for the properties we expect on our project entities, which we can define at the top of src/app.tsx
import { Entity } from "@blockprotocol/graph";

type ProjectProperties = {
  name: string;
  description: string;
  keywords: string[];
}; // define the properties we expect on projects

type ProjectEntity = Entity<ProjectProperties>; // create a type for project entities

export const App: BlockComponent<BlockEntityProperties> = (
  {
    // ...
  },
) => {
  // ...
  // find only the entities in linkedEntities which appear as the destination of one of the projectLinks
  const linkedProjects = linkedEntities?.filter((linkedEntity) => {
    return projectLinkGroup?.links.find(
      (link) => link.destinationEntityId === linkedEntity.entityId,
    );
  }) as ProjectEntity[] | undefined; // tell the TypeScript compiler that this will only contain ProjectEntities
  // for a robust block you should instead check that the contents are as expected
  // ...
};
Now we have a variable, linkedProjects, which contains the entities linked to the blockEntity on the path "projects".
We can display them to the user, e.g. like this:
<>
  <h2>Projects</h2>
  {linkedProjects?.map((project) => (
    <div>
      <h3>{project.properties.name}</h3>
      <p>{project.properties.description}</p>
    </div>
  ))}
</>
What I have so far
Here's the complete app.tsx after taking the previous steps
import {
  BlockComponent,
  useGraphBlockModule,
} from "@blockprotocol/graph/react";
import { useRef } from "react";

import styles from "./base.module.scss";

import { Entity } from "@blockprotocol/graph";

type BlockEntityProperties = {
  description?: string;
  name: string;
  profession: string;
};

type ProjectProperties = {
  name: string;
  description: string;
  keywords: string[];
};

type ProjectEntity = Entity<ProjectProperties>;

export const App: BlockComponent<BlockEntityProperties> = ({
  graph: {
    blockGraph,
    blockEntity: { entityId, properties },
  },
}) => {
  const blockRootRef = useRef<HTMLDivElement>(null);
  const { graphModule } = useGraphBlockModule(blockRootRef);

  // Extract linked entities and links from blockGraph;
  const { linkedEntities, linkGroups } = blockGraph ?? {};

  const projectLinks = linkGroups?.find((group) => {
    return group.sourceEntityId === entityId && group.path === "projects";
  });

  const linkedProjects = linkedEntities?.filter((linkedEntity) => {
    return projectLinks?.links.find(
      (link) => link.destinationEntityId === linkedEntity.entityId,
    );
  }) as ProjectEntity[] | undefined;

  /** Here we extract the properties from the blockEntity's properties */
  const {
    description = "[Person has not provided a description]",
    name,
    profession,
  } = properties;

  return (
    <div className={styles.block} ref={blockRootRef}>
      <h1 style={{ fontSize: 62 }}>{name}</h1>
      <h2>{profession}</h2>
      <p>{description}</p>
      <h2>Projects</h2>
      {linkedProjects?.map((project) => (
        <div style={{ borderBottom: "1px solid black", paddingBottom: "16px" }}>
          <h3>{project.properties.name}</h3>
          <p>{project.properties.description}</p>
        </div>
      ))}
    </div>
  );
};
This is a very basic data display – you can change the fields used, and add some simple styling to make it more appealing.
Editing data
Once you're happy with how the data is being displayed, you could add editing capability to your block.
Here's how.
Using the Block Protocol API
Your block has a graphModule variable in it. This is a reference to a handler for block-application communication.
The handler has a number of methods available on it which correspond to messages your block can send to the application.
Messages are used by the block to make requests for the creation, editing, or deletion of entities, links, or types.
It is up to the embedding application which requests are permitted. Our mock application permits everything.
We are going to be using one such message: updateEntity. A full list is available in the graph message definitions.
To send a message to the embedding application, we call the relevant method on graphModule, passing the expected data.
Here, we use the updateEntity method (docs).
This is a request to the application to update an entity. It expects two fields:
the
entityIdof the entity to updatethe new
propertiesto give the entity
We want to update the entity currently associated with our block, so we pass the entityId from blockEntity.
We want to update the description, so we pass a properties object which includes the existing object, plus a new description.
This sends a request to the application. If successful, the entity will be updated, and the new value for blockEntity sent to the block.
<input
  onChange={(event) =>
    graphModule?.updateEntity({
      data: {
        entityId, // this is `blockEntity.entityId` – we extracted it earlier
        properties: { ...properties, description: event.target.value },
      },
    })
  }
  value={description}
/>
We can also make individual projects editable – we must remember to use their entityId and properties,
and be careful not to send the blockEntity's by mistake:
<>
  <h2>Projects</h2>
  {linkedProjects?.map((project) => (
    <div>
      <h3>{project.properties.name}</h3>
      <input
        onChange={(event) =>
          graphModule?.updateEntity({
            data: {
              entityId: project.entityId,
              properties: {
                ...project.properties,
                description: event.target.value,
              },
            },
          })
        }
        value={project.properties.description}
      />
    </div>
  ))}
</>
You can add editing capability for as many or as few fields as you like.
Respecting 'read only' mode
If your block implements editing, it should also implement a 'read only' mode, so that it can be used when editing isn't allowed.
We've covered two messages that the embedding application sends the block:
blockEntity: theEntityassociated with the blockblockGraph: the network of entities connected to the block via links
Another is readonly: this is a simple boolean that tells the block whether it should be in "read only" mode or not.
An application might set a block to "read only" mode because it is displaying data as a static webpage, or because the current user doesn't have permissions to edit the entities provided to the block.
If readonly === true, then an embedding application is likely to reject any requests to mutate data.
You can implement readonly mode by taking the property from the graph object passed to your block,
and adjusting or disabling your block's UI depending on its status.
For example, we might show text inside of a text input for our description if readonly mode is on.
{
  readonly ? (
    <p>{description}</p>
  ) : (
    <input
      onChange={(event) =>
        graphModule?.updateEntity({
          data: {
            entityId, // this is `blockEntity.entityId` – we extracted it earlier
            properties: { ...properties, description: event.target.value },
          },
        })
      }
      value={description}
    />
  );
}
Going further
Here are some ideas for how to further improve your block.
Introducing local state
Earlier, we have the values for our text input pulled directly from blockEntity, and called updateEntity every
time the user pressed a key.
This means that the value in the input only updates when the application has processed the updateEntity request
and sent the updated value for blockEntity back to the block. In a real application this round trip
might take long enough that the user notices the value of the input is lagging behind their key presses.
Alternatively, we could hold local state while the user is typing, and only send a request to the application in response to some other action that indicated the user was finished – e.g. pressing a button, or focusing elsewhere.
Here's an implementation that uses local state:
import { useRef, useState } from "react";

// ...

const [draftDescription, setDraftDescription] = useState(description);

// ...

<>
  <input
    onChange={(event) => setDraftDescription(event.target.value)}
    onBlur={() =>
      graphModule?.updateEntity({
        data: {
          entityId, // this is `blockEntity.entityId` – we extracted it earlier
          properties: { ...properties, description: draftDescription },
        },
      })
    }
    value={draftDescription}
  />
</>;
Dealing with external changes
If we introduce local state to our block, we introduce the possibility of a mismatch between the data sent from the application and the data held by our block in local state.
Any entity, including the block entity, may be updated elsewhere in the application.
The entity currently loaded into our block may be loaded into other blocks too – our block doesn't have ownership on it.
Or another user may be using the same block on the same page to edit the same entity, on another client.
When they do so, the embedding application should send an updated blockEntity – and our block should react to it.
It could automatically update its internal state with the new data.
useEffect(() => {
  // do something to update local state when blockEntity changes
}, [blockEntity]);
Your block could instead inform the user that updated data is available, and ask them if they want to overwrite their local state.
Either way, if you also allow entities from blockGraph to be edited, you should take the same approach for them.
Publishing
We have a Hub of blocks available at https://blockprotocol.org/hub – here's how to get your block on it.
Publishing for the first time
In your browser
- Sign up for an account at https://blockprotocol.org if you haven’t already
- Create an API key and copy it: https://blockprotocol.org/account/api
In your terminal
- Run
npm run buildoryarn buildto create a production build of your block in thedist/folder - run
npx blockprotocol@latest publishto generate a.blockprotocolrcfile at the root of your project - Replace the placeholder key in that file with your API key
- now run
npx blockprotocol@latest publish - See your block on the Hub using the provided link!
- Here’s an example block page: https://blockprotocol.org/@hash/blocks/person
Updating your block
You can update your published block at any time by running
npm run build && npx blockprotocol@latest publish or yarn build && npx blockprotocol@latest publish
You can also update the metadata in your block to change its display on the Hub:
Setting preview description / images in the hub
- take a screenshot of your block in action and replace
public/block-preview.png– this is shown on https://blockprotocol.org/hub to preview your block - update the
descriptionin package.json – it is the intro to your block in the Hub and on its page- the image and description are also used when sharing a link to your block on Slack etc
- update your block’s icon (
blockprotocol.iconinpackage.json) - update your block’s
README.md– it will appear below your block on its hub page
Setting example data in the hub
You can set example data that will be used as the starting properties for your block in the Hub.
The simplest way is to take the data you have used in dev.tsx as follows:
- update the example object in the
blockprotocol.examplesarray in package.json to match your sampleblockEntity, e.g.
// package.json
{
  // ...
  "blockprotocol": {
    // ...
    "examples": [
      {
        "entityId": "person1",
        "properties": {
          "description": "Here's a new description",
          "name": "Ciaran",
          "profession": "Software developer"
        }
      }
    ]
    // ...
  }
  // ...
}
- Create a file called
example-graph.jsonat the root of your project (alongsidepackage.json). This is a file which acceptsentitiesandlinks– you can use the same values as you did for your sample entities indev.tsx, e.g.
// example-graph.json

{
  "entities": [
    {
      "entityId": "project1",
      "properties": {
        "name": "Block Protocol",
        "description": "An open standard for building block-based interfaces",
        "keywords": ["blocks"]
      }
    },
    {
      "entityId": "project2",
      "properties": {
        "name": "HASH",
        "description": "Create shared, structured knowledge",
        "keywords": ["ontology", "data", "workspace"]
      }
    }
  ],
  "links": [
    {
      "sourceEntityId": "person1",
      "destinationEntityId": "project1",
      "linkId": "link1",
      "path": "projects"
    },
    {
      "sourceEntityId": "person1",
      "destinationEntityId": "project2",
      "linkId": "link2",
      "path": "projects"
    }
  ]
}